To learn more about how to make your materials accessible, please see our other posts on digital accessibility. The author wishes to thank ATS instructional designers Joe Olivier and Cheryl Walker and Emily Baker of the Center for Digital Accessibility for valuable comments and suggestions on this post. He also wishes to thank Dale Mertes, digital media specialist, for providing custom graphics.
Whether you are using a flipped classroom, supplementing in-class lectures with asynchronous video, or simply recording a lecture before going out of town for a conference, it is important to ensure that your instructional videos are accessible. In this post, we will provide some helpful tips that you can implement before, during, and after the video production process to heighten accessibility. (The next post in this series will address the related question of accessibility when recording a podcast.)
Record Video Accessibly
Here are some tips that may help you as you record your video. The more of these you are able to implement, the likelier it is that your video will be comprehensible and usable by all students, including those with disabilities.
Pre-Production
- Consider using a script. This is not a requirement, but it may be helpful to you in planning out how much you have to say, how much board space it will require, when you want to pause, and so on. It can also reduce the chances of your digressing in ways that students with cognitive impairments or ADHD may find hard to follow. As an additional boon, using a script can allow you to include verbal descriptions of visual content in your presentation, such as key images, which removes the need to add a separate audio description after recording.
- Minimize background noise. Ambient noise makes it harder for all students, especially those with hearing impairments, to understand your speech. You might consider reserving a dedicated video production space, such as the OneButton Studio or podcasting space in Regenstein, for your recording.
- If you will be using the UChicago Lightboard, talk with AVS about your range of marker colors, and make sure you choose those that will show up well and contrast with one another.
During Production
When recording the video itself, keep the following points in mind.
- Speak clearly. As much as you can, make sure that you enunciate and that individual words can be discerned from one another. It will help here if you can face the camera when speaking, so that, for example, students who can read lips will have an additional aid to understanding. (Note that the UChicago Lightboard makes it easy to write and face the camera at the same time.)
- Write clearly on any chalkboard/whiteboard/Lightboard you may be using, and ensure that your handwriting is both large and legible.
- Add signposts, visual and oral, as you present. For example, if you are recording a cell biology lecture, you might pause writing for a moment and say. “That concludes our discussion of the mitochondrion. Now, we’re moving on to the Golgi apparatus.” Not only does this help students follow the flow of your thought, but it also makes it easier to break the video into smaller chunks later if needed.
- Explain any technical jargon or idioms you use while speaking, to help users with cognitive difficulties, those for whom English is an additional language, etc. Also be sure to define acronyms, even those you think are familiar, on first use.
Post-Production
Aside from closed captioning (which we will discuss in its own section later), there are two chief considerations when you edit your video in post-production: text and graphics.
Add Accessible Text
When adding text:
- Choose an accessible font, ideally a sans serif font such as Arial, Calibri, or Verdana.
- Ensure that there is sufficient contrast between the text and its background, e.g. by placing white text in a black box or vice versa. Remember that, as outlined by WebAIM in their article on contrast, color contrast between text and background should be at least 4.5:1 (for regular text) or 3:1 (for large text). You can use WebAIM’s own Color Contrast Checker to make sure your contrast is sufficient.
- Make sure your text stays on the screen long enough to be read through carefully. You might practice by reading aloud to yourself slowly, to see how long the text should remain on the screen.
Add Accessible Graphics
When adding graphics:
- Make sure your graphics do not convey information by color alone, and that the color contrast is sufficient for individuals with color vision deficiency to make them out.
- Eschew or warn about flashing graphics. If you do use flashing graphics, be sure they obey the “no more than three times per second” guideline set by Web Content Accessibility Guidelines (WCAG).
- Avoid excessively “busy” or cluttered graphics. These can be distracting and cause students to lose sight of the key takeaways.

This “cluttered” image is difficult to scan visually.
This “cleaned-up” graphic is easier to scan. (Graphics credits: Dale Mertes)
Caption Your Video Accessibly
To comply with accessibility guidelines, you should always caption your videos. Captions are vital not only for individuals with permanent or temporary hearing impairments, but for those who are unfamiliar with the language, those who are watching the video in a setting where noise is not permitted, etc.
There are three options for captioning in Panopto.
- Automatic captioning. This is available for all videos that have spoken dialogue. It uses Automatic Speech Recognition (ASR) to generate captions.
- Manual captioning. You can upload a .vtt file (a text file with timestamps) to caption your video manually.
- Professional captioning. For a fee, you can request professional captioning for your video.
Due to recent improvements in ASR, Panopto’s automatic captions are generally of high quality, but they are not perfect. If you choose to use the automatic captioning option, be sure to:
- Allow adequate time after recording. The ASR option will not be available immediately when the video is completed. (For a lengthy video such as an hour-long lecture capture, it may take an hour or more before ASR is available; for shorter videos, it will be sooner, which is another reason why you may wish to divide your video into chunks.)
- Always check the automatic captions manually to fix errors, e.g. with names, other proper nouns, or technical terms. For help in this respect, please see Panopto’s documentation on editing and deleting captions.
- Consider adding or editing captions to denote sounds and auditory cues that ASR does not capture, such as background music or off-camera noises. The ideal is for a hearing-impaired user to get the full experience that they would if they were listening to the video.
In addition to closed captioning within the video itself, it is also worthwhile to furnish students with a transcript–a complete record, in text form, of the words spoken in the course of your video. Transcripts have many uses: to help students understand the video; to allow those who learn most easily by reading, rather than viewing, to access information in their preferred modality; to help students when they are in an environment where viewing the video itself is not feasible; and so on.
Generate a Transcript in Panopto
After recording or uploading your video to Panopto, you can generate a clean transcript (one that is free of timestamps) due to recent accessibility updates in Panopto. Note, however, that this auto-generated transcript will not label the different speakers, and this information will need to be manually added.
Generate a Transcript in Zoom
If you are recording a Zoom meeting to the cloud, you can generate an automatic transcript during the meeting. Unlike a Panopto transcript, a Zoom transcript will indicate who is speaking, along with the timestamp at which that individual began speaking.
Whichever method you choose, please see the section “Share Your Video Accessibly” below for tips on making the transcript available along with the video.
Share Your Video Accessibly
Once your video is complete, captioned, and ready to share with your students, there are several ways you can share it. We will focus here on two methods: sharing via Canvas Module and sharing via embedding in a Canvas Page.
Share Your Video in a Module
If you decide to add your video to a module using External Tool, you can use the following steps to maximize accessibility.
- Make sure that “Load video in a new tab” is checked. This will give the video more screen “real estate,” which is helpful to students with vision limitations (and other students as well).
- Give the video a descriptive title. By clicking the column of three dots across from the video and choosing Edit, you can change the name shown in Canvas to whatever you wish. You may wish to indicate a) that the video is a video, and b) that it opens in a new tab.
- Include the transcript in the module. You can add the transcript as a .txt file or other format to the module below the video. Again, a descriptive name will be helpful.”

In this Canvas Module, the instructor has added both a video and a transcript, each with a descriptive name.
Embed Your Video in a Canvas Page
You can embed your Panopto video in a Canvas page (or other web page, such as a Voices site) by generating an embed code and pasting it into the HTML of the page. If you choose this route, here are some helpful tips.
- Set Autoplay to Off. Auto-playing videos can be distracting to viewers, especially if they do not expect it. (However, if you have a student with a mobility impairment that causes them difficulty in playing the video, you can instead set Autoplay to On. If you choose this option, you may wish to inform your students in advance that the video will auto-play.)
- Set Show Captions to On. This will display captions by default when your students play the video.
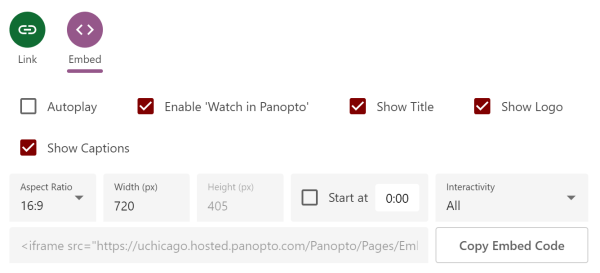
Here is an example of settings for an embedded video. You can adjust these for your video within the Share option in Panopto.
Panopto now generates an ARIA description attribute for each video that will appear in the embed code, as an aid for users of screen readers and other assistive technologies. By default, this attribute is the same as the video title, but you can edit it manually to make it more descriptive if you wish.
Once you have embedded your video in a Canvas Page, you can then add the transcript below it by copying and pasting the text into the Rich Content Editor, by adding the file itself, or both.
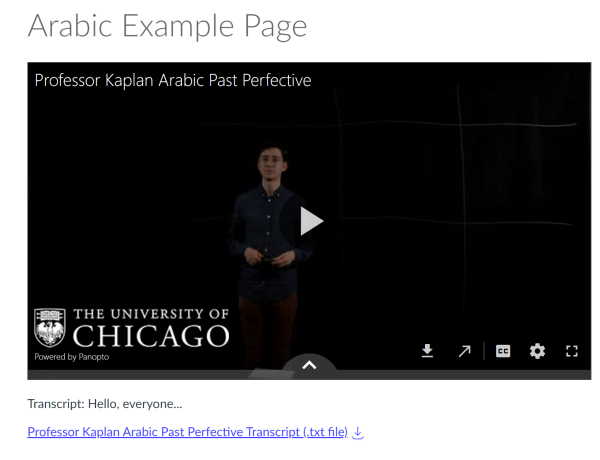
In this image of an example Canvas Page, the instructor has both pasted a transcript into the page itself and uploaded the transcript file, which students can then download in turn.
Make Your Video Downloadable
Regardless of the method you choose to share your Panopto video, you might consider making it downloadable by your students. This is useful for students with slow or no internet connectivity at home, allowing them to watch the video offline at their leisure. To make your video downloadable, go to Settings→Overview in Panopto, scroll down to the Downloads section, and choose Authenticated users with access from the drop-down menu.
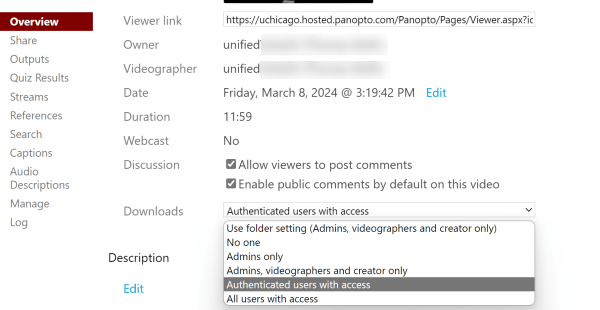
Here, the video owner has selected Authenticated users with access, allowing students who are logged into Panopto with their UChicago credentials to download the video.
Conclusion
If you think through accessibility before beginning your video and keep it in mind at every stage, you will find that the end product is easier to use not only for students with disabilities, but for all your students. This will enhance their educational experience and help you to achieve your pedagogical goals.
Further Resources and Getting Help
- Many of the points addressed in this article are discussed in more detail in the LinkedIn Learning course Creating Accessible and Inclusive Video.
- To learn more about Panopto, we invite you to visit our Panopto service site.
- For more information on digital accessibility generally, you may find the Center for Digital Accessibility website helpful.
- You are welcome to visit our office hours, attend one of our workshops, or book a consultation with an instructional designer.
(Cover Photo by Jaël Vallée on Unsplash)
